• About
  • Transformations
  • Personal Training
    • Online PT
  • Tips
  • Gallery
  • Shop
ForestFit

Seasons

All
Autumn
Healthier Happier Greener
Spring
Summer
Winter

Pork Sausage, Jerusalem Artichoke & Cabbage Traybake

15/3/2022

0 Comments

 
Proof that eating seasonally will improve the variety of food you eat! I had never eaten a Jerusalem artichoke before, so I chose this meal for my first taste as there is minimal effort that goes into its preparation meaning you get to taste it in a fairly raw form. We were pleasantly surprised with the results. We've definitely been missing out, I think the main reason being that we had never been exposed to this veggie as children, so it always seemed a bit weird to see one in a shop - being creatures of habit it's easy to just leave it alone, not knowing how it tastes or what to do with it, and stick to the veggies we know. Ultimately, we now have another fantastic tasting ingredient added to our winter pantry!

So, for this very simple and healthy, seasonal recipe, you'll need...

A little oil of choice
8 pork sausages
500ml chicken stock
500g Jerusalem artichokes (no need to peel for this recipe; just scrub clean and cut into halves)
1 Savoy cabbage
seasoning
thyme
paprika
chilli flakes
Picture
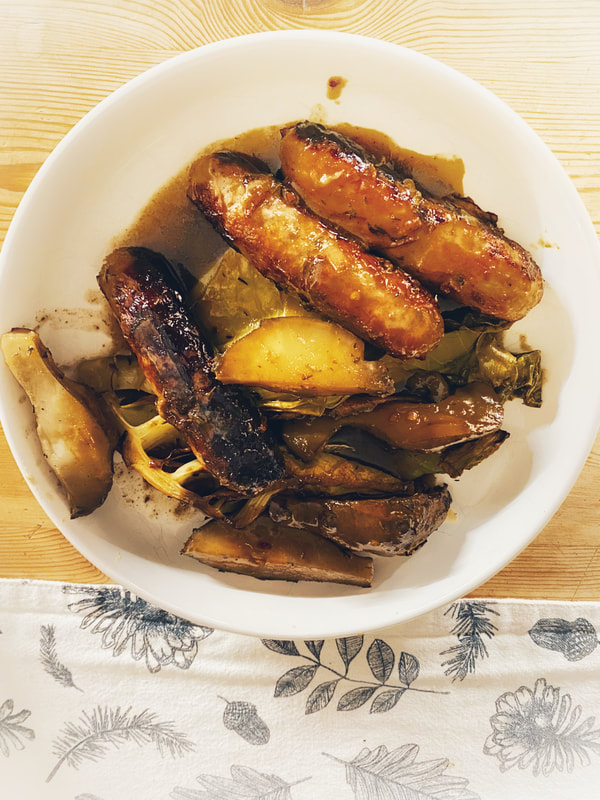
Fry the sausages for about 10-minutes to brown them.

Add them to a deep baking tray along with the chicken stock and the Jerusalem artichokes, cover and cook in the oven at 180C for 15-minutes.

Lift the cover, add the seasoning, thyme, paprika, chilli flakes and cook again for 15-minutes.

Finally, add the cabbage leaves and cook for a further 10-15 minutes. 
0 Comments

Pan-fried Duck & Butterbeans

13/4/2021

0 Comments

 
Picture
A super easy recipe for a fancy, delicious dish. 

This is a recipe I found from Jamie Oliver, and is extremely healthy and tasty. You only need a few ingredients and it doesn't take very long at all. It's a great meal to have in spring or winter as all ingredients should be available locally-sourced. You could actually make this any time of year and be within season, but I find it's better to bring this dish out as a treat in the bleaker months when the variety of ingredients are a bit more scarce, so I would say you'd appreciate this meal more between say November and April. 
All you need is...
  • Duck breast (free-range or higher welfare)
  • 1/3rd tin of butterbeans
  • 50g spinach (or more)
  • 2 bacon medallions (organic, pasture-raised or higher welfare) or better yet, I dice up some of my own home-smoked, Honey & Clementine Gammon which I smoke outdoors every Boxing Day and freeze what is leftover to use for meals like this!
  • garlic
  • rosemary
  • balsamic vinegar
  • salt and pepper
(ingredients per person)
  1. Lightly score the skin of the duck breast width ways about 1 or 2cm apart, this will allow the juices to come out more to make a thicker and tastier sauce. Season the skin side with a little salt and black pepper. 
  2. Place the duck breast skin-side down on a cold pan and turn the hob to medium-high heat. Cook this side for 8-minutes without touching it, meanwhile dice the bacon medallions. Then, turn the duck breast over and fry for a further 4-minutes skin-side up. Remove the duck breast and put onto a separate plate to rest (leave the fat in the pan)
  3. Add the bacon (or smoked gammon), rosemary and chopped garlic (or granules if you don't have fresh garlic) to the pan with the duck fat and cook.
  4. Once the bacon/gammon is cooked, add a dash of vinegar to help scrape up anything that has stuck to the pan, add the butterbeans with their juices, allow to simmer for a while, and then add the spinach. 
  5. I like to use a lot of spinach as it has so much goodness, so once some has partially wilted, add a little more and cook until wilted. It always appears that you've got way too much spinach -- until you cook it and realise you should have made more, so make sure you give yourself plenty. Serve up and enjoy!
0 Comments

Cauliflower Garlic Bread (serve w/ Lean Beef Bolognese)

13/3/2021

2 Comments

 
Picture
Picture
Cauliflower Garlic Bread

3 cups riced cauliflower
6 eggs, separated
1 1/4 cup almond flour OR 1/2 cup coconut flour (I used)
1 tbsp baking powder
6 tbsp melted butter
5 garlic cloves, minced
1 tbsp thyme, chopped
1 tbsp parsley, chopped
Salt

Cauliflower is a good source of fibre, contains lots of vitamins and is in season all year round; normally from Cornwall in the winter and from the north in Summer. Where I look to keep my body fat down I avoid bread made from wheat (as much as I can) so that is where something seasonal and healthy like a Cauliflower Garlic Bread recipe comes in handy!

Preheat oven to 180℃. Grate or blend 3 cups of cauliflower (approximately a whole cauli). Microwave riced cauliflower in a small bowl for 3-4 minutes and allow to cool, while you separate the egg yolks into a large mixing bowl and the whites into a separate bowl. Whip the egg whites until soft peaks form, like a meringue, and set aside. Add the flour, baking powder, melted butter and garlic to large mixing bowl with the egg yolks with about a quarter of the whipped egg whites. Mix well. 

Now that the cauliflower is cool enough to handle, soak up as much moisture as you can and then add to the mixed ingredients along with the remaining egg white. Again, mix well then stir in most of the herbs (but leave a little for the topping). 

Line a 24cm loaf tin with parchment paper and spoon in the batter. Bake for 50 minutes.
2 Comments

Chicken & Leek "Lie-Pie"

13/3/2021

1 Comment

 
Picture
1 Comment

Rosemary Seasoned Wild Pheasant with Roasted Grapes and a Savory Shallot Pan Sauce

13/3/2021

1 Comment

 
Picture
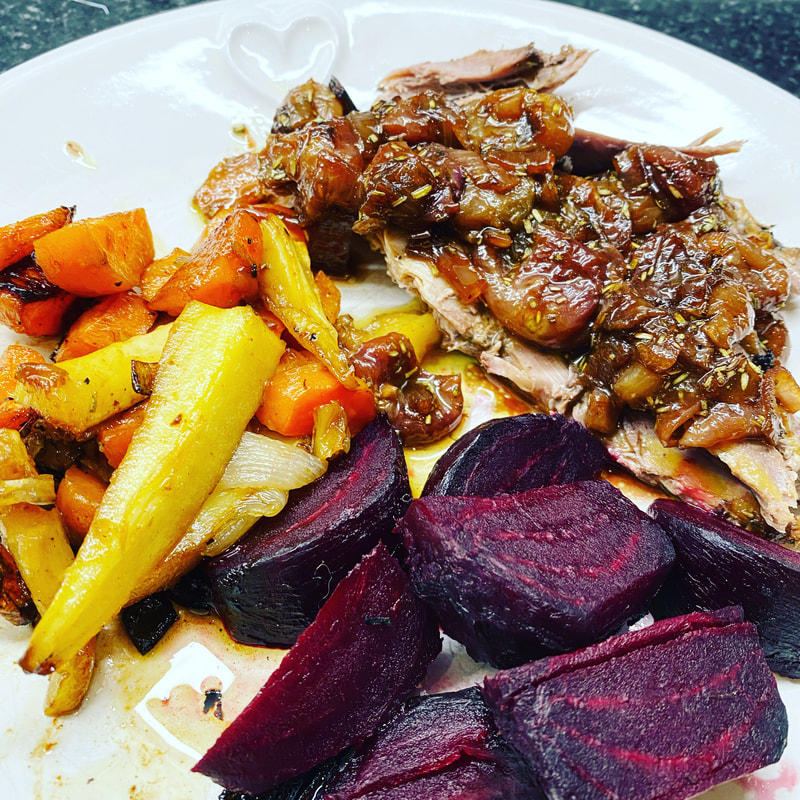
You may think that eating seasonally through the winter months require a bit more experience or experiments! But there's so many great options out there that are unique to this cold season. Pheasant is aplenty for this time of year, but it does have a tendency to dry out, as it is quite easily overcooked. I seal them in a very hot pan first to stop them drying out in the process. And of course root vegetables too, like parsnips and carrots. Follow the steps below and the result will be a happy, unique and tasty winter warmer...
​
  • 2 Pheasant Breasts
  • Salt
  • 2 tsp Rosemary
  • One handful of Grapes
  • 1 small Shallot
  • 150ml Chicken Stock
  • 2 tbsp White Balsamic Vinegar*
  • 2 tbsp extra virgin olive oil
  • Parsnips
  • Beetroot
  • Red Onion
  • Carrots 
 
  • Preheat the oven to 180C. Place all of your veggies in a deep baking tray and put into oven, meanwhile, season the pheasant breasts with salt, pepper, and a 1tsp of rosemary.
  • After about 15mins of the vegetables roasting, put the grapes on a sheet pan and drizzle 2tbsp oil over them, then roast for about 15 minutes.
  • While the grapes are roasting, brown the pheasant breasts in a hot saute pan. Sealing the breasts like this will avoid them drying out. After they have browned on both sides, remove them from the pan and put aside for a moment - and add the shallots. Brown the shallots for several minutes and deglaze the pan with the white balsamic vinegar and stock, scraping the bits in the bottom. Add another teaspoon of rosemary and return the pheasant breasts. By now the grapes should be roasted and they can be added to the saute pan with the pheasants along with their juices.
  • Allow the pheasant and sauce to simmer on low until the pheasant is cooked through and the sauce has reduced, your roasted winter vegetables should also now be ready!

​
Picture
1 Comment

EASY Homemade BBQ Slow Cooked Brisket

13/3/2021

1 Comment

 
Picture
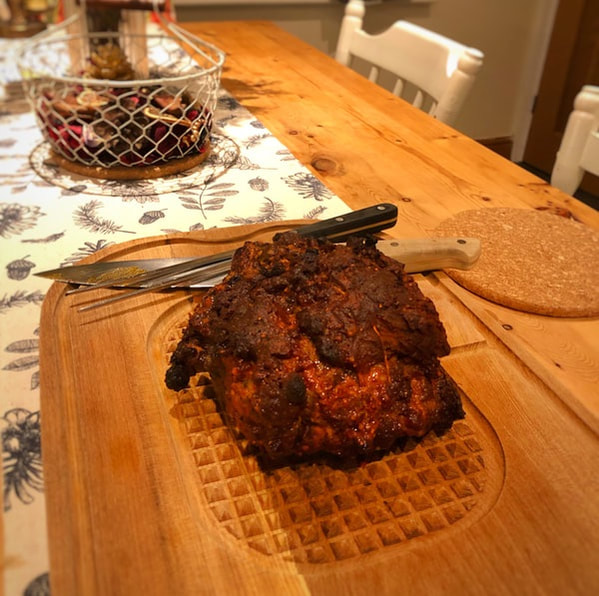
Please note this method is an easy way to cook indoors at home, but I use my smoker outside all year round for EVEN better results. Smoking meat on a smoker outdoors is an entirely different method... Recipe in a future book ;-) 

Homemade BBQ Rub:
4 tablespoons brown sugar
4 tablespoons paprika
A generous amount of black pepper all over
1 tablespoon sea salt
1 tablespoon chilli powder
1 tablespoon garlic powder
2 tablespoons olive oil
1 1/2 tablespoons apple cider vinegar 
1 tablespoon dijon mustard
(for approx 1kg brisket, increase measurements for larger size)

Brisket is a tough and hard-working slab of meat, so it needs some time and love to bring out its flavour - but when you do the flavour is incredible. This recipe is very straightforward and easy, so don't feel daunted that the time means too much effort, it's super simple! I prefer to use a smoker but this guide is for an indoor cook!
  • First, put the brisket into a large bowl, leave out of the fridge for at least 20-minutes (this helps the oven work a bit more efficiently - a little greener decision!).
  • Add all of the ingredients to the bowl and mix well with your hands, blending all of this homemade rub over the meat.  
  • Place the rubbed brisket into your oven at 200C for 30-minutes.
  • Take out of the oven after the 30-minutes, turn brisket over and cover with tin foil. Turn oven down to 140C and return for around 2-hours (based on 1kg).  Your brisket is now ready to either slice or shred! Serve with corn on the cob and perhaps a homemade slaw - or, my favourite, chilli and lime butter

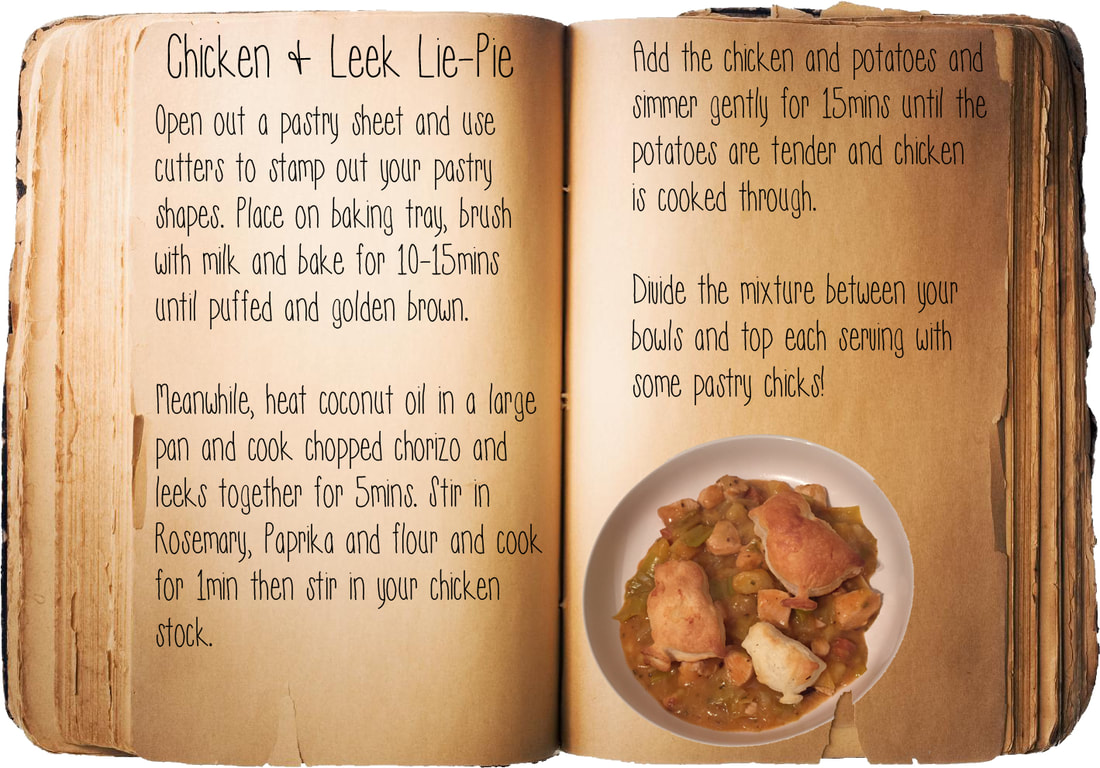
This is perfect all year round;  for summer (best cooked on the BBQ though) or using the above procedure for winter or if you don't have a smoker! 
Picture
Picture
1 Comment

Winter Game Pie

13/3/2021

0 Comments

 
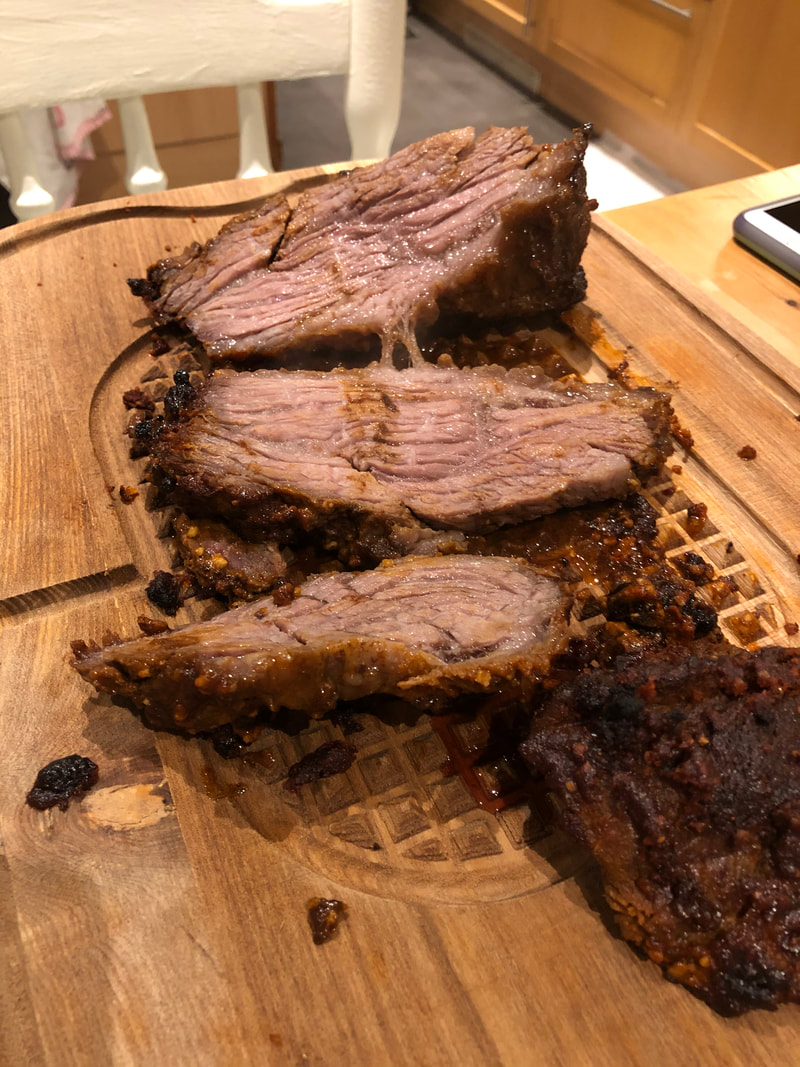
500g Game Meat (venison, pheasant, pigeon, rabbit, partridge etc. locally sourced)
2 tbsp oil (of your choice)
2 shallots
2 slices of bacon (medallions are leaner)
Handful of seasonal mushrooms
2 cloves of garlic
1 tbsp plain flour
1 bay leaf
1 tbsp redcurrant jelly
150ml chicken stock
150ml red wine
Shortcrust Pastry
Salt & Pepper
1 egg
Seasonal vegetables to serve (depends on the month that you make this!)

[Before beginning this recipe be mindful of which seasonal vegetables you are using and begin cooking these at the appropriate time for best results with your chosen veg]

- Add 1tbsp of your chosen oil to a pan and brown the meat. Remove and put on a plate to one side
- Add the other 1tbsp of oil to the pan and add the chopped shallots, it will take about 5-minutes for them to soften, then add the chopped bacon, sliced mushrooms and finely diced garlic - cook for 3-minutes
- Mix the flour into the onion, bacon, mushroom, garlic combo for 2-minutes, season with salt and pepper and stir in the bay leaf, redcurrant jelly, chicken stock, redcurrant jelly and the wine. 
- It will being to boil, add the meat, then let it simmer for 15-minutes.
- Heat your oven to 200C, add everything from the pan into pie dishes and make a small pastry lid for to cover. Of course this isn't the healthiest part of the recipe but the meat isn't entirely cased in pastry, so it's not as bad as a normal pie.
[One big tip I can give you here to make this recipe even healthier and still "pie-like" is to use a small shaped cutter on the puff pastry (perhaps a rabbit or a bird like we did!) and bake them in the oven on a sheet and then place it on  top of the meat to serve. I normally call this my "Lie Pie" which I use mostly with my Chicken, Chorizo & Leek Lie Pie.]
- Decorate the top of the pastry and glaze with beaten egg.
- Put completed pie dishes in oven for around 25-minutes and cook vegetables.
- Serve and enjoy a healthier, happier and greener meal!
Picture
0 Comments

    by Shane

    "The desire for a Happier, Healthier & Greener lifestyle - simplified!"

    Seasons

    All
    Autumn
    Healthier Happier Greener
    Spring
    Summer
    Winter

    RSS Feed

We Would Love to Have You Visit Soon!


Telephone

07985 125202

Email

[email protected]
  • About
  • Transformations
  • Personal Training
    • Online PT
  • Tips
  • Gallery
  • Shop